X1016-v1.0 Software & Configuration
Introduction
This tutorial assumes you've already set up a Raspberry Pi with Raspberry Pi OS with desktop (Release date: July 4th, 2024, System: 64-bit, bookworm). For help installing the Debian-based OS on your Pi, refer to the official Raspberry Pi documentation.
1.0 Check Kernel Version
To check the kernel version, execute the following command:
Pi@raspberrypi ~ $ uname -a

1.1 Enabling PCIe Interface
First, enable the external PCIe port on the Raspberry Pi 5. Edit /boot/firmware/config.txt and add the following at the bottom:
Pi@raspberrypi ~ $ sudo nano /boot/firmware/config.txt
# Enable the PCIe external connector
dtparam=pciex1
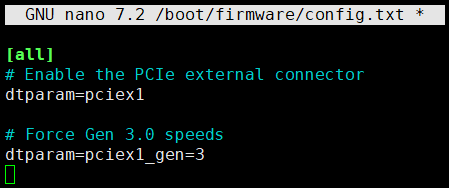
# Optionally, you can force it to Gen 3.0 (8GT/sec)
dtparam=pciex1_gen=3
WARNING: The Raspberry Pi 5 is not certified for Gen 3.0 speeds, and connections to PCIe devices at these speeds may be unstable.
Save and exit. In nano, you do that by hitting CTRL + X, answering Y, and hitting Enter when prompted.
1.2 Edit EEPROM Configuration
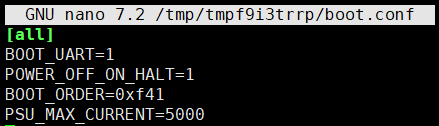
If powering via the on-board DC jack, edit the EEPROM configuration:
Pi@raspberrypi ~ $ sudo rpi-eeprom-config -e
Add PSU_MAX_CURRENT=5000 at the end of the file.
1.3 Reboot the Raspberry Pi
Pi@raspberrypi ~ $ sudo reboot
1.4 Display PCIe Devices
Use the lspci command to display your PCIe devices:
Pi@raspberrypi ~ $ sudo lspci

2.0 Build the Kernel and Apply Patch
2.1 Install Git
To get the kernel source, you need Git. Begin by installing Git on your device, if you don’t already have it:
Pi@raspberrypi ~ $ sudo apt install git
2.2 Download Kernel Source
Download the source code for the latest Raspberry Pi kernel:
Pi@raspberrypi ~ $ git clone --depth=1 https://github.com/raspberrypi/linux
This can take several minutes.
2.3 Install Build Dependencies
Pi@raspberrypi ~ $ sudo apt install bc bison flex libssl-dev make
2.4 Download the Patch
Pi@raspberrypi ~ $ wget https://EDGECASE.com/downloads/x1016.patch
2.5 Move to Linux Folder
Pi@raspberrypi ~ $ cd linux
2.6 Apply the Patch
Pi@raspberrypi ~/linux $ git apply /home/pi/x1016.patch
If the x1016.patch is not downloaded to /home/pi, change the directory.
2.7 Build Configuration
Pi@raspberrypi ~ $ KERNEL=kernel_2712
Pi@raspberrypi ~ $ make bcm2712_defconfig
2.8 Build the Kernel (64-bit)
This step can take a long time, depending on your Raspberry Pi model.
Pi@raspberrypi ~/linux $ make -j6 Image.gz modules dtbs
2.9 Install Kernel Modules
Pi@raspberrypi ~/linux $ sudo make -j6 modules_install
2.10 Create Backup and Install Kernel
Run the following commands to create a backup image of the current kernel, install the fresh kernel image, overlays, README, and unmount the partitions:
Pi@raspberrypi ~/linux $ sudo cp /boot/firmware/$KERNEL.img /boot/firmware/$KERNEL-backup.img
Pi@raspberrypi ~/linux $ sudo cp arch/arm64/boot/Image.gz /boot/firmware/$KERNEL.img
Pi@raspberrypi ~/linux $ sudo cp arch/arm64/boot/dts/broadcom/*.dtb /boot/firmware/
Pi@raspberrypi ~/linux $ sudo cp arch/arm64/boot/dts/overlays/*.dtb* /boot/firmware/overlays/
Pi@raspberrypi ~/linux $ sudo cp arch/arm64/boot/dts/overlays/README /boot/firmware/overlays/
2.11 Reboot with New Kernel
Finally, run the following command to reboot your Raspberry Pi and run your freshly-compiled kernel:
Pi@raspberrypi ~/linux $ sudo reboot

For further assistance or inquiries, please reach out to our support team at info@edgecase.shop or sales@edgecase.shop. We are here to help you with any questions you might have.