X1301-v1.1 Software & Configuration
This tutorial assumes you've already set up a Raspberry Pi with Raspbian12 (bookworm). For help installing the Debian-based OS on your Pi, check out the documentation on Raspberrypi.org.
1.0 Check the Kernel VersionExecute the following command:
pi@raspberrypi:~ $ uname -a 1.1 Enable the Device Tree Overlay
Edit the /boot/firmware/config.txt file:
pi@raspberrypi:~ $ sudo nano /boot/firmware/config.txtAdd the following lines at the end of the file:
dtoverlay=tc358743,4lane=1
dtoverlay=tc358743-audio
Save and exit. In nano, you do that by hitting CTRL + X, answering Y, and hitting Enter when prompted.
1.2 Reboot the Raspberry Pipi@raspberrypi:~ $ sudo rebootpi@raspberrypi:~ $ v4l2-ctl --list-devices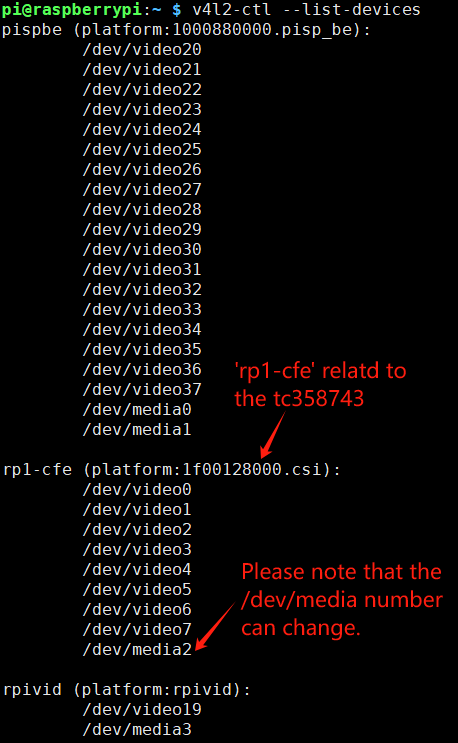 1.4 Create an EDID Text File
Set up the HDMI to CSI adapter before connecting it to an HDMI source. This EDID file will enable the supported video and audio modes.
pi@raspberrypi:~ $ sudo nano 1080P60EDID.txtCopy the EDID data below and paste it into 1080P60EDID.txt:
00ffffffffffff005262888800888888
1c150103800000780aEE91A3544C9926
0F505400000001010101010101010101
010101010101011d007251d01e206e28
5500c48e2100001e8c0ad08a20e02d10
103e9600138e2100001e000000fc0054
6f73686962612d4832430a20000000FD
003b3d0f2e0f1e0a202020202020014f
020322444f841303021211012021223c
3d3e101f2309070766030c00300080E3
007F8c0ad08a20e02d10103e9600c48e
210000188c0ad08a20e02d10103e9600
138e210000188c0aa01451f01600267c
4300138e210000980000000000000000
00000000000000000000000000000000
00000000000000000000000000000015
Save to /home/pi and exit. In nano, you do that by hitting CTRL + X, answering Y, and hitting Enter when prompted.
1.5 Load the EDID Datapi@raspberrypi:~ $ v4l2-ctl -d /dev/v4l-subdev2 --set-edid=file=/home/pi/1080P60EDID.txt --fix-edid-checksumspi@raspberrypi:~ $ v4l2-ctl -d /dev/v4l-subdev2 --query-dv-timings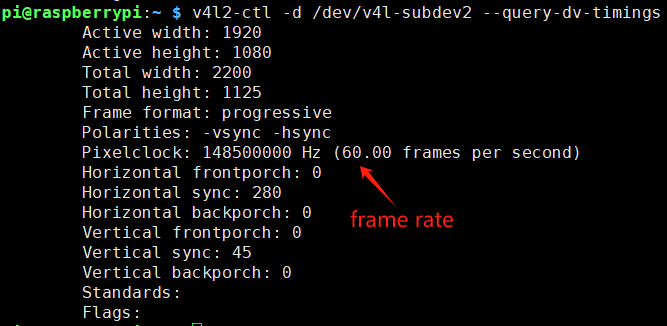 1.7 Apply the Screen Timing to the Capture Setup
pi@raspberrypi:~ $ v4l2-ctl -d /dev/v4l-subdev2 --set-dv-bt-timings querypi@raspberrypi:~ $ media-ctl -d /dev/media2 -rPlease note that the /dev/media number can change. Go to step 1.3 to check the media number.
1.9 Set Formatspi@raspberrypi:~ $ media-ctl -d /dev/media2 -l 'csi2:4 -> rp1-cfe-csi2_ch0:0 [1]'
pi@raspberrypi:~ $ media-ctl -d /dev/media2 -V 'csi2:0 [fmt:RGB888_1X24/1920x1080 field:None colorspace:Srgb]'
pi@raspberrypi:~ $ media-ctl -d /dev/media2 -V 'csi2:4 [fmt:RGB888_1X24/1920x1080 field:None colorspace:Srgb]'pi@raspberrypi:~ $ v4l2-ctl -v width=1920,height=1080,pixelformat=RGB3Filename: csitest.yuv
pi@raspberrypi:~ $ v4l2-ctl --verbose -d /dev/video0 --set-fmt-video=width=1920,height=1080,pixelformat='RGB3' --stream-mmap=4 --stream-skip=3 --stream-count=2 --stream-to=csitest.yuv --stream-pollUse FFplay. (This will not work if executing the command from SSH).
pi@raspberrypi:~ $ ffplay -f rawvideo -video_size 1920x1080 -pixel_format bgr24 csitest.yuv
For further assistance or inquiries, please reach out to our support team at info@edgecase.shop or sales@edgecase.shop. We are here to help you with any questions you might have.